Showing posts with label Chicken Raising Ideas. Show all posts

Sunday, June 12, 2011

Summer begins in Earnest!

Very Busy Weekend!

This weekend was very busy..We had two goats that were no longer " pulling their weight" so they needed to be "harvested"  Also a dairy goat farmer let us know that his most recent kidding produced a lot of Male kids..and that we could have up to 6 for $10 each...so we bought 3..one to eventually be our Stud...
http://www.youtube.com/watch?v=quZyyvUPQ3I
the other two we "banded" and will grow up to be harvested in the spring.  At the same time we arrived home with our new kids..my two nephews and eldest son came for a visit!

In the mean time..we harvested the two older goats..
and Howard and my nephew Mikey went to work butchering.

After That was done and the roasts rolled..and the extra ground..We made Sausages! Breakfast style and supper style..21 METRES!!

We ended up with 6 Roasts, 9 packets of Ground meat and 21 metres or 24 packages of sausage!
Andrew and Howie assembled and added two new supers to the hives...
 
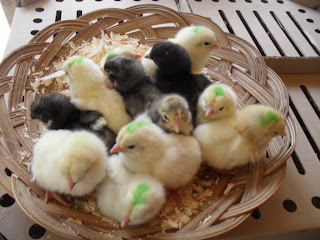
The little black hen hatched out 12 eggs and because they were unexpected and not planned for..we sold them to a neighbour.
 
some have Green dots on their heads to tell them apart from the meat chicks they were cuddling up to until they were taken to their new home.
And at 47 years old..I find myself bottle feeding babies again 4 times a day!


But it is a labour of love..even if SOME do get Jealous!
And Still I managed to Plant some cayene
Peppers, Celery,Basil and Asparagus!


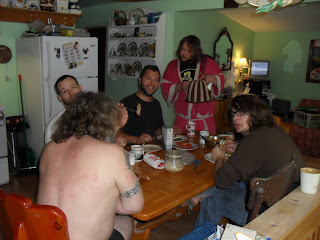
It WAS a lot of work..but we had wonderful help..and we still managed to have a lovely visit !! All in all? we had a WONDERFUL weekend!

Today after a brunch of Goat sausage patties, eggs, toast and stir fried steak with pepper mushrooms and onions...my eldest son and my nephews left..and Left ME.... counting my blessings and knowing what a LUCKY woman I am!!

CHEERS!~


Tuesday, May 31, 2011

Life Runs Amok!

Life Happens...

Saturday Night Howie and I got home from our 9 day trip away in Arizona..Our !8 year old son had looked after things..All the animals were fine..Bizzy the new mummy Goat is now able to share 1 cup of her milk with us per day...and that will increase as the needs of Clover and Blossom increase..so that when they begin to wean off..I will continue to take the same amount they were taking so that her milk does not decrease as their demand goes down.  Bizzy and I are both new to this..she is a new mom and new to having someone milk her..and I am new to milking..but we are getting there!

Yesterday I weeded 3 rows of beans..it took me all day..as I had fallen in the Driveway Sunday Morning and was very stiff..but I manage to get the tasks assigned to myself done..if a little slowly!  Some of the bean plants did not come..so as I weeded I replanted some seed in the bald spots.

Howie noticed when we got home..that one of our hens was missing..it is not hard to miss her as she is the only black chicken..we found her in the hay loft sitting on a nest of 15 eggs!!! 


She had decided to move out of the hen pen and into the hayloft to try and hatch out some eggs..she does NOT like being moved off the nest..or to much attention paid to her..We have decided to allow her the right to try and hatch out her eggs...Broody chickens this day in age are not easy to find..so we want to encourage her as much as ppossible..if however she has not hatched by mid June..we will have to remove her from the nest.  I hope for her sake she gets a few chicks..the rooster was put in the freezer two weeks ago..so some of her eggs should still be fertile. We will keep you posted!
In the mean time I am preparing for a busy summer of gardening, canning and workshops!
Our two other adult goats..the young buck and the older doe are both going to be dispatched and made into chops and sausages...the buck cannot be used to breed the two little does as he is their sire..and the older doe did not breed..so in the freezer they go! We don't raise pork..so this is a good opportunity to make some Bratwurst and breakfast sausages!  Bizzy along with daughter clover and blossom will be bred next fall ( 2012) and by June 2013, we  will have 3 milking goats..this will hopefully see to all our milk, butter ( once I have the cream separator) yogurt and cheese needs!!  In the mean time we will be content with what Bizzy shares!  Hope you enjoy the little video!

http://www.youtube.com/watch?v=XQuwiZ9QxU8

Cheers!

An Update
Licorice has stopped laying and is now sitting on her eggs full time!

Thursday, July 1, 2010

Poultry Tractor!

Hey Folks!

The poultry Tractor is done...or Almost..It still needs the wheels..but Howard forgot to buy Carriage bolts..but that can wait until next week...Unlike the previous tractor I made..THIS one was made by my husband and is MUCH sturdier and will last quite a few seasons!  It is also studier because this one is Housing Turkeys! Yes they are finally in their home..and once the wheel are on..they will be able to be moved to fresh ground from time to time with minimal fuss! Here it is Being Built!

This is the floor..The whole frame is made of  Eight foot spruce 2x3's..The floor is laid with 2x4 fourteen gauge fence wire..to support the weight of the birds when we move it and to keep predators out.

Once the frame was constructed..Howie tore down a dog cage that we bought at a yard sale..and used the panels and latches ..We were dividing the cage into two sections..one is 4 feet by 5 feet for the three large white turkeys..as they will grow much bigger than the heritage bronze turkeys..the other side is 3 feet by 4 feet..like I said..they will be periodically moved to fresh grass  so that they will always be clean!

The Centre is divided with a piece of the 2x4 fourteen gauge fencing..this way they can visit..the the larger turkeys will not hurt the smaller ones.  Howard is putting a tin back and roof on the tractor to give the birds more shelter from inclement weather. The handles you see are like that of a wheel barrow..so that the tractor can be easily moved.


We have moved in now..and Howard is nailing down the roof.

Here they are..all safe and sound..the large white on the left and the smaller bronze on the right...I have given them some straw in a corner for bedding..the smaller chicks actually have a milk crate on it's side with some straw in it..because until today..they lived in the relative coziness of the front porch.  As you can see..I have reinforced the cage panels with chicken wire to ( hopefully) keep out weasels!

TA DA!!!
Thank you Once again Howard..for being the amazing man you are!!

Cheers!

Wednesday, March 24, 2010

My chicken coop

The Coop
Last Spring my husband built me a chicken coop for my laying hens...The construction for laying hens..is somewhat important because they have to live in it all winter..and they also need to be kept safe from predators such as raccoons, skunks and coyotes.  This coop is NOT insulated..but that will change before this coming winter...here is a step by step pictorial of how it was built..and other than the 2x4s.. and chicken wire..this coop was biult entirely out of recycled materials!! So although it is going under the "chicken raising Ideas" label..it could also go under waste not want not!!

My husband first dug 4 post holes and planted the yard posts 2 feet deep..then built the floor joists.

Then he laid the first layer of floor boards..we debated as to whether or not we should put a layer of TIN roofing under the floor board to discourage things like rats and squirrels and weasels..but we just laid two layers instead.

Then the plywood layer went down...

The front and back walls went up..the front wall has a nice big window facing east to get the morning sun!

The door..

The Inside..The 2x3s on the left were meant to hold the nesting boxes...but ended up being roosts..we used old milk crates for nesting boxes..which you will see if you look at the pictures of the building of the heat lamp in this section of the blog.

Done!  As you can see there are two little sliding doors on the front near the door..this is to allow the chickens into their yard during the day...as the sun sets..they will naturally go inside to "roost" and then you can close those doors to keep them safe inside.  By the big door you can see a window..this is something we had on hand..rather than screen..we tacked chicken wire up on the inside..this way in hot weather we can leave the window open for extra ventilation.

My husband is putting up the chicken wire..there is a locking door into their yard in case I need to get in there..and I often use it to toss them vegatable kitchen scraps..If you look carefully at the bottom of the fence you will see tin..this tin is cut in 18 inch high strips and is BURIED 12 inches UNDER the ground along with the chicken wire!! This is very important...CHickens bathe by coating themselves in dirt then shaking it off..its called "dusting" and they can dig a hole right under the fence..not to mention burrowing predators like weasels...your laying hens are an investment..they need to be protected.

A Final layer of chicken wire is run accross the top of the yard and nailed in place..this discourages raccoons..although the chickens are safe inside at night..should the raccoons get into that yard...it would not be difficult for them to get inside one of those push up doors after that..so we make it as difficult as possible..so they will look elswhere for a meal.

These are my Barred Plymouth Rocks..they are a good dual purpose bird..on the floor is a shredded news print..only because its summer..in the winter I use STRAW...NOT HAY.

Hope you found this informative.
CHEERS!!

Tuesday, March 16, 2010

Brooder

Chick Brooder


Recently I collected eggs from my hens and put them in my incubator.
 I gathered 33 eggs. I hope to hatch at least 20 chicks. My next problem is a brooder for them. A Brooder is  ( for those who do not know) is a place to keep the chicks warm until they grow feathers enough..and the outdoor temps are warm enough..that they can go outside in their coop.  Last year..When I bought 11 chicks from the co-op..I kept them in them basement..I made a brooder out of an old trunk..and a heat lamp from a 60 watts bulb and fixture.
However..This year..I have the potential of hatching 25-33 chicks...and will need a larger space...This  gave me  pause..as I do not have space in my coop to section off an area to brood chicks..and for the first couple of weeks..its best to do it in the house, where I can control the heat.
But my husband is very close to finishing our basement..and I have no "rough" basement area to corner off and put a LARGE box in.
But I came up with an idea!
A local Hardware store has sold and is selling off stock at clearence prices..and I noticed a small plastic wading pool about 4 feet across!!
THis would be PERFECT..it is plastic so will protect the floor of where ever I choose to place it..and will be easy to clean afterwards!!
NOW..the only problem left..was how to keep the chicks inside it once they grow big enough to hop the 8 inch edge...Then I had another IDEA!! Also at the same hardware store..I bought his last 2 remaining rolls of 24 inch high chicken wire...I bought this to put around my garden this year..just to train my dogs not to go in that area..And while I slept..or tried to, last night..I came up with a plan...why not do the same with the chick pool???
My husband stopped tonight at the same hardware store and..at my request..picked up six, 3 foot lengths of 1/4 inch dowel...and here is what I did!

TA DA!!!!!
We wound the wire around the pool..holding it up with the dowel..when we reached the end..we just over lapped the edge ..pulled it tight..and sewed the ends through with the last stick of dowel..it holds the wire snug agains the pool sides!!  It is also completely collapsable and reusable!!!  I am already saving newspaper to shred in the shredder for bedding..and my husband will bring in the heat lamp from the coop ( they won't need it now till next winter) and rig it up to hang over top!!! I will take pictures once the chicks are in the brooder!! This is in my sewing room..which is the most unused area in the basement right now.
Hey Folks! Here is an update on the brooder...It is now in my front porch. I have surrounded it by an old piece of roofing tin..to keep the dogs and some drafts out...
and am now testing it for temprature.

If the temps are to hot or too cold..I will simply adjust the height of the lamp..The chicks are due to hatch in a few days..and I want to be ready!
CHEERS!

Sunday, March 7, 2010

SPRING!!!

Spring...

Spring being just around the corner, I felt it was time to gather some eggs for hatching...for 6 days..I kept back the best of my daily lay..It is not reccomended to keep eggs longer than one week or they can lose viability for hatching...I kept them in a cooler cracked open..with a cold pack wrapped in a damp cloth for humidity.  As of today I have 33 eggs in the incubator!  I followed directions and neither washed the eggs or kept any that were too dirty..to small..to large or misshapen...I set up the incubator last night to make sure the temperature would be just right today...and this morning I placed them in the incubator!!!!

Today is Day 1!!
Every couple of days I will fill the little water resevoir in the bottom to keep the humidity just right...and on March 28th..I should have 25-30 chicks!  I am hoping at least half will hatch...giving me some for refreshing the hen house..and the rest for Fattening up for the freezer! I will keep you posted!
CHEERS!!

Sunday, December 13, 2009

Home Made Heat Lamp!

Home Made Heat Lamp

I Went to the local farm supply store...( Local being over an hour away) I wanted to buy a heat lamp to see my chickens through the winter

..to my Shock and dismay..the lamp was $35 !!!!! Couple That with the $10 infa-red bulb..and taxes..you are paying $50 !!!! So I decided..We will Make one..I am pretty handy with ideas..and Howard is a WHIZ at helping me to put them into Practice...so heres what we did..
I bought a mid sized lightweight tin bucket at Dollarama...$2


We removed the Handle and as you can see..Howard has snipped a hole in the bottom.
He has then added an electrical coupler thingamajiggy on either side of the hole... when screwed together it holds the 1/2 inch deep pan electrical box in place  inside

..the pan box is what the ceramic socket is screwed to...
It is imporatant that the light socket is CERAMIC..this is because I will have a heat lamp inside..so plastic will not do. Then we used a piece of a heavy extension cord for the wiring...you can see the coupler better in this shot.


Then used a wire guide to take the weight off the cord.

 
We then screwed in the 175 watt infared bulb!

Howard then stretched a piece of chicken wire fencing across the mouth of the bucket, this is to keep the birds from pecking the bulb...It was then secured into place with aluminum foil muffler tape!

It was then hard wired into a light switch in the chicken coop..and hung in place.


It is high enough to stay well away from the straw..and far out enough to be well away from combustable materials..yet low enough to keep the water from freezing.


Bulb included...the whole thing cost less than $25!!!
Pretty cool Aye???
If you have some cool Ideas..or just want to comment..Please feel free to leave a comment at the end of this article..if you do not have a web ID ..just list your comment under anonymous!

Disclaimer!!!
Neither my husband or myself are electrical professionals..we do this at our own risk. If you should decide to try this project and have any doubts..PLEASE feel free to ask a professional electricians advice!